THE FRAMEWORK
Next.js
A ready-made structure for building a website. Each folder you make becomes a page, and one command turns the whole project into plain HTML, CSS and JavaScript.
SESSION PLAN
PART 1
Audit your Week 4 Figma file for what an agent needs before it can build from it.
PART 2
The tools used by almost every modern website, and why you would use them instead of plain HTML.
PART 3
Storybook shows every component you build on its own, in every state, so you can check each one before it goes on a page.
PART 4
Install the tools, create your app, add Storybook, and build off a Figma design.
PART 1 · RECAP · DESIGNING FOR THE HANDOFF
LECTUREPART 1 · RECAP · DESIGNING FOR THE HANDOFF
DESIGN.md can only describe what is actually in the file. Your agent can help you audit your Figma file to make handoff to code more seamless.
# Figma file auditAudit this Figma file. For each area below, report what you find and name the layers that need fixing.## 1. Typography styles- Do text styles exist?- Are they applied consistently?## 2. Color variables- Do color variables exist?- Are they applied consistently?## 3. Spacing variables- Do spacing variables exist?- Are they applied consistently?## 4. Radius variables- Do radius variables exist, if the design uses rounded corners?- Are they applied consistently?## 5. Components- Do components exist?- Are instances used consistently, or are there detached copies?- Which repeated elements should become components?- Which components, like buttons, need variants for hover and other states?## 6. Naming- Is every layer named? (No "Frame 12" or "Rectangle 4".)## 7. Auto layout- Where should auto layout be used but isn't?PART 2 · NPM, NODE.JS, REACT AND NEXT.JS
LECTUREPART 2 · NPM, NODE.JS, REACT AND NEXT.JS
Until now your site was a few files. You opened index.html and the browser showed it. Tonight you build the way most sites are built now. You work in small reusable pieces, a tool puts them together, and what comes out is still a set of plain files that GitHub Pages can host.
Four tools, stacked. Each one needs the one below it.
THE FRAMEWORK
A ready-made structure for building a website. Each folder you make becomes a page, and one command turns the whole project into plain HTML, CSS and JavaScript.
THE UI LIBRARY
Lets you build the interface out of components: a button or a nav bar written once and used everywhere. Next.js is built on it, so you get React without installing it yourself.
In Figma
THE PACKAGE MANAGER
Comes with Node. It downloads packages, code other people have written and shared, and keeps a list of every one your project uses. Its partner npx runs a tool once without keeping it. You use npx tonight to create your app.
In Figma
THE ENGINE
Runs JavaScript on your computer instead of in a browser. You never write anything for it. You install it once because the tools above are written in JavaScript, and Node is what runs them.
CHECK YOUR NODE VERSION
node -vCREATE THE APP
npx create-next-app@latest appMakes the app in a folder called app. When it asks about defaults, choose: Yes, use recommended defaults.
START YOUR SITE
cd appOnly run cd app if you are not already in the app folder.
npm run devThen open localhost:3000 in your browser.
PLAIN HTML FILES
NEXT.JS
Copy the nav into every page
Write one nav component
Make and link each page by hand
Each folder becomes a page
Refresh after every save
The page updates when you save
Paste someone else's code
Install and track it with npm
PART 3 · STORYBOOK, YOUR COMPONENT LIBRARY
LECTUREPART 3 · STORYBOOK, YOUR COMPONENT LIBRARY
Last week you made components in Figma and gave each one its states. Storybook is where those components live once they are code. It opens in your browser next to your site and shows each component by itself instead of in a page. When a button looks wrong on your site, you open it in Storybook and see whether the button is broken or the page around it is.
In Figma
A story is one state of one component. A button might have four stories, named Default, Hover, Focus and Disabled, the same states you listed in DESIGN.md.
In Figma
BUTTON · FOUR STORIES
ADD STORYBOOK
cd appOnly run cd app if you are not already in the app folder.
npm create storybook@latestWhen it asks: “Are you new to Storybook?” → Yes “Would you like to install AI features?” → Yes “Do you want to install Playwright with Chromium now?” → Yes
SEND TO YOUR AGENT
Run `npx storybook skills setup` and follow its instructions precisely.Paste this to your agent, not the terminal.
OPEN STORYBOOK LATER
cd appOnly run cd app if you are not already in the app folder.
npm run storybookThen open localhost:6006 in your browser.
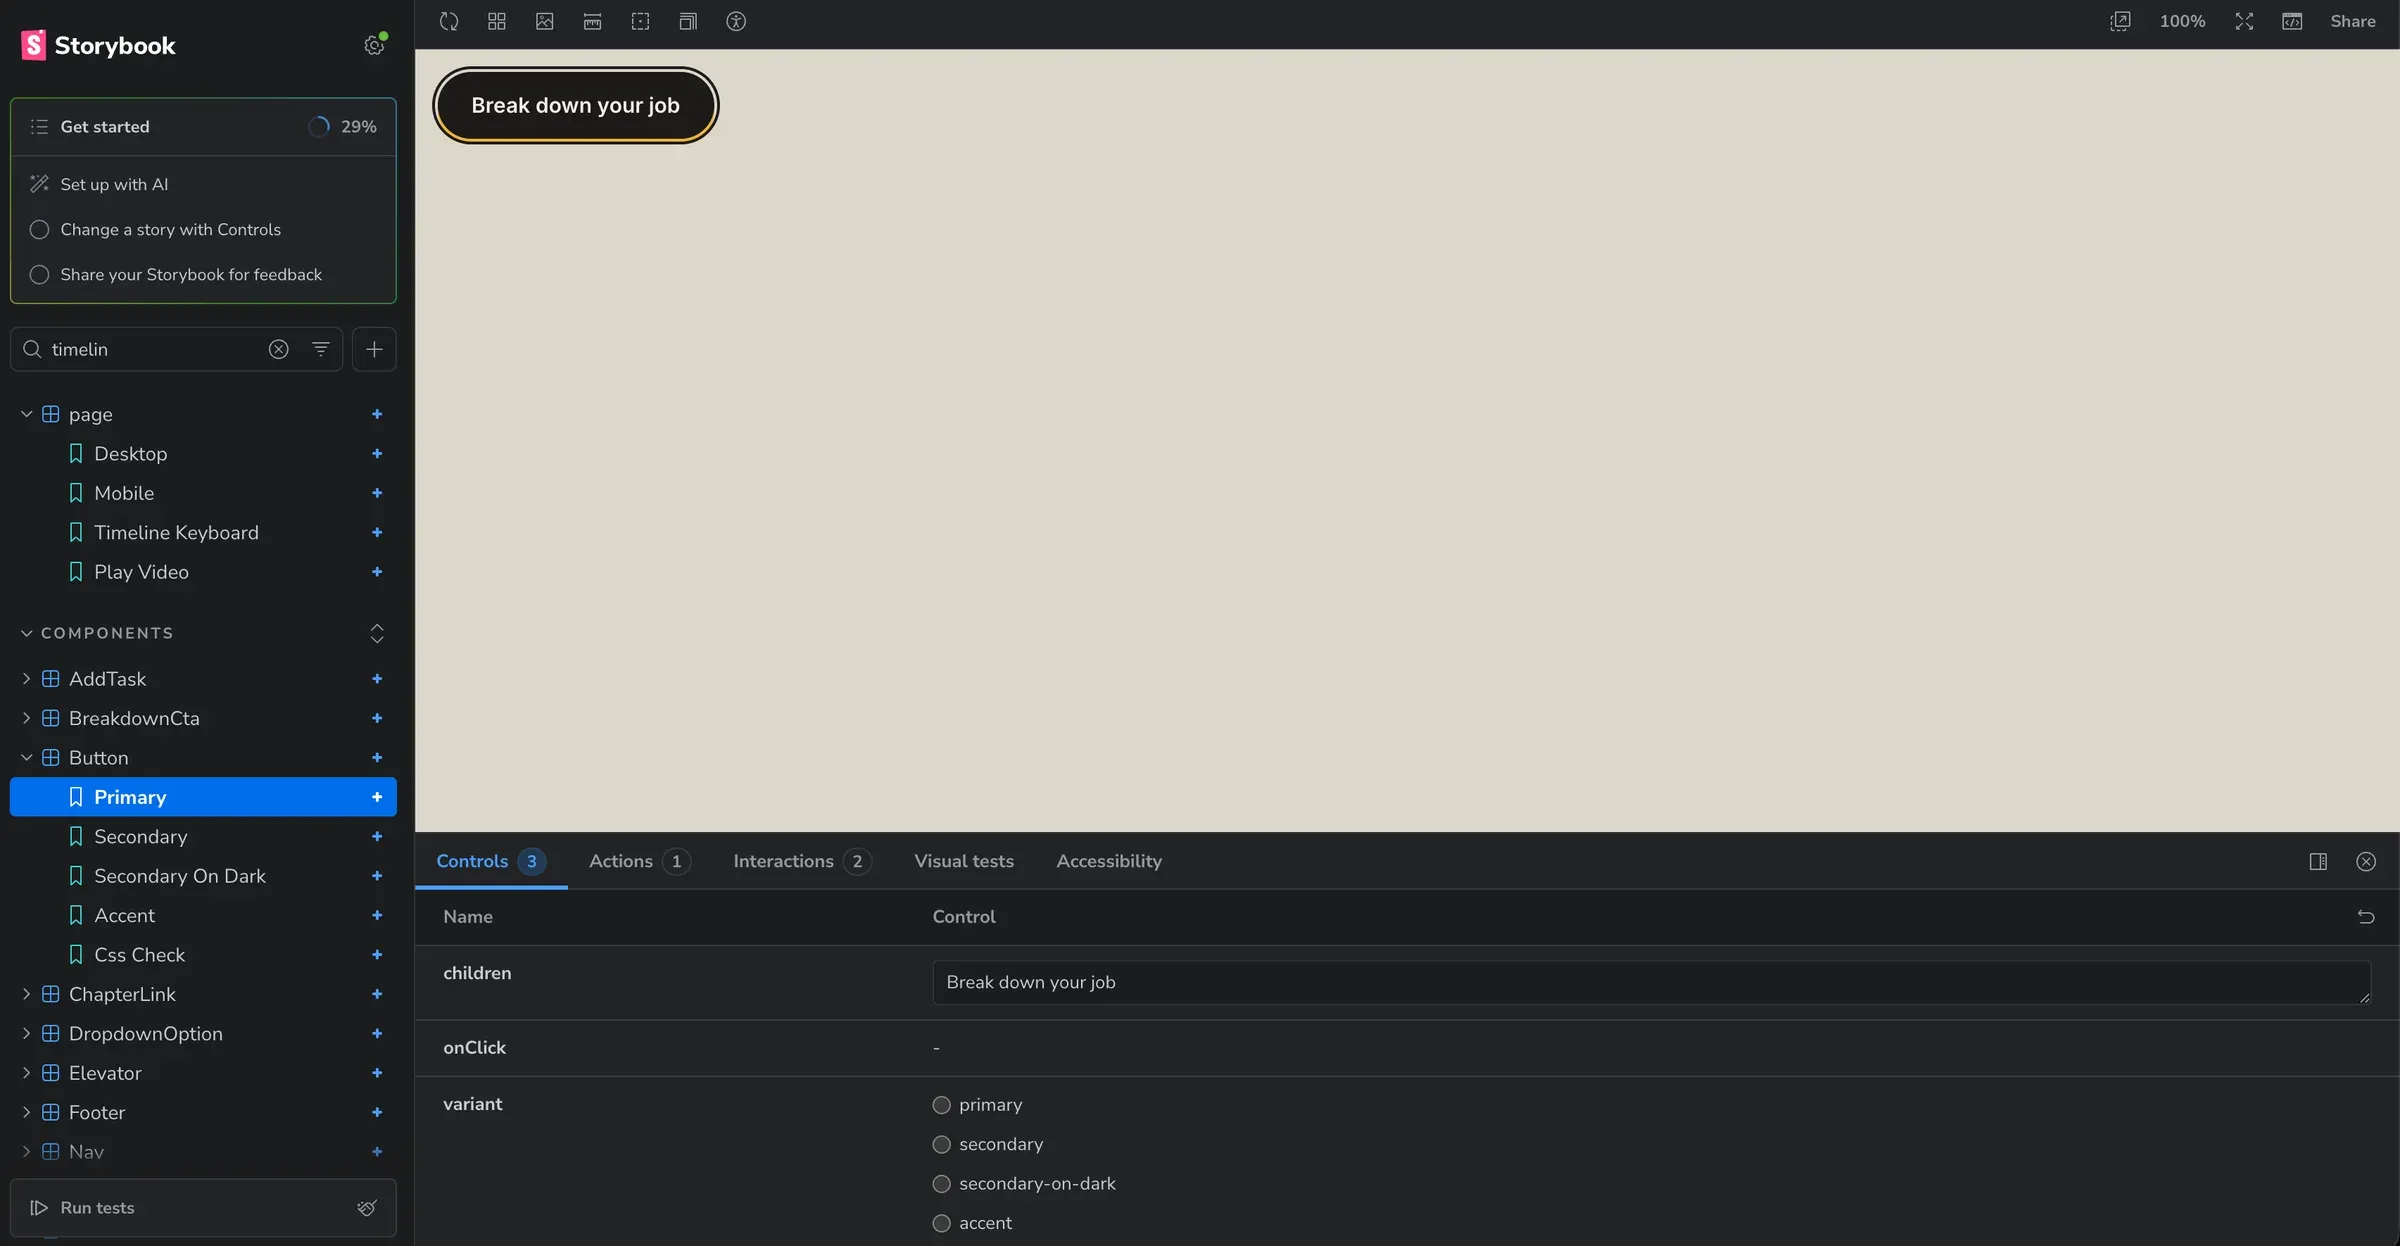
Swipe the screenshot sideways to inspect each pin.
1 · Sidebar
Every component and its stories.
When an agent changes a whole page at once, it can break one component while fixing another. You might not notice until much later. Storybook gives you a list of every component and every state to check after each change.
It also helps you tell your agent what is wrong.
WITHOUT STORYBOOK
“The page looks off.”
WITH STORYBOOK
“The Disabled story of the button has the wrong gray.”
The second one names the component and the story, so the agent fixes the right thing.
PART 4 · SET UP, BUILD AND SHIP
LABPART 4 · SET UP, BUILD AND SHIP
Tonight your Figma design becomes a real website. Do the steps in order. Run every command in the terminal, inside your assignment folder. If something breaks, paste the error to your agent.
1
Accept the assignment on Classroom 50. It creates this week's repo. Clone it and open the folder in your editor.
classroom50.org/fitnyc-ct390/rapid-prototyping-with-ai/assignments/week-5/accept (opens in a new tab)2
Open the Feedback page in your Week 4 Figma file. Address its AI-generated notes on color, typography, components, and other issues it flags. Use Figma AI where you can so you have tokens left for the build part of this lab.When your fixes are done, ask your agent to regenerate DESIGN.md from your updated Figma file and push it to the root of your Week 5 repo.
3
Install the LTS version of Node.js if you haven't already, then check that it worked.
nodejs.org/en/download (opens in a new tab)node -v4
Create the app in a folder called app, inside your assignment folder.Make a file called AGENTS.md at the root of your assignment folder, next to the app folder, and paste the rules below into it.Start the site. Leave it running and open a second terminal tab.
CREATE THE APP
npx create-next-app@latest appMakes the app in a folder called app. When it asks about defaults, choose: Yes, use recommended defaults.
PASTE AT THE BOTTOM OF AGENTS.MD
## Project rules### Project layout- This Next.js app lives in the `app/` folder of the repo. Paths below are relative to `app/`, and every npm and npx command runs inside `app/`.- `.github/`, AGENTS.md and DESIGN.md stay at the repo root, outside `app/`. Keep anything already in `.github/`.### Styling: Tailwind CSS and DESIGN.md- Style everything with Tailwind CSS utility classes. Tailwind is already installed. Do not add another CSS framework or component library, CSS Modules, styled-components, or inline `style` attributes.- DESIGN.md at the repo root, outside `app/`, is the source of truth for colors, type, spacing and components. Read it before building or changing any UI.- Define every DESIGN.md token once, as a CSS variable inside the `@theme` block in `app/globals.css`, so it becomes a Tailwind class like `bg-primary` or `text-heading`.- Use those token classes in components. Never hard-code a hex color, font or pixel size that DESIGN.md already names. If DESIGN.md is missing a value you need, ask before inventing one.- `.storybook/preview.tsx` imports `app/globals.css`, so Storybook shows the same styles as the site.### Components before pages- DESIGN.md is the reference for every component and every page.- Build each component from the Figma design on its own, with a story for every state designed in Figma, before using it in a page.- Check every page at desktop width and at 375px wide.### Deployment: static GitHub Pages, built by GitHub ActionsThis site is hosted on GitHub Pages. GitHub Pages serves static files andruns no code. There is no server, no Vercel, and no serverless functions.Every feature must work as plain HTML, CSS and JavaScript produced by`npm run build`.- Deploy with a GitHub Actions workflow at the repo root, `.github/workflows/deploy.yml`. Its run steps use `working-directory: app`. Do not deploy from a branch, and never commit `out/` or `.next/`.- The workflow runs on every push to `main`. It runs `npm ci` and `npm run build`, uploads `app/out/` with `actions/upload-pages-artifact`, and publishes it with `actions/deploy-pages`.- The site is served from a subpath, `https://<owner>.github.io/<repo-name>/`. Set `NEXT_PUBLIC_BASE_PATH` to `/<repo-name>` in the build step.- `next.config.ts` sets `output: 'export'`, `trailingSlash: true`, `images: { unoptimized: true }`, and `basePath` read from `process.env.NEXT_PUBLIC_BASE_PATH` (empty string when unset).### Storybook- `.storybook/main.ts` finds stories anywhere in the project, not only in `stories/`.- Delete the example stories Storybook creates in `stories/`. They are not part of this site.- Once Storybook is installed, publish it at `https://<owner>.github.io/<repo-name>/storybook/`.- In the workflow, after `npm run build`, add a step that runs `npx storybook build --output-dir out/storybook`. It must run after the Next.js build, because that build replaces `out/`.- Link to the live site and the live Storybook from README.md.### Do not use- Server Actions, Route Handlers (`app/api/`), or `proxy.ts` / middleware- `cookies()`, `headers()`, `draftMode()`, or anything that reads the request- `redirects`, `rewrites` or `headers` in `next.config.ts`- `revalidate`, ISR, or `export const dynamic = 'force-dynamic'`- Dynamic routes without `generateStaticParams()`- `next/image` with the default loader- `@vercel/*` packages, the Edge runtime, or any hosted database or KV store- API keys or secrets. Anything in the build is public.### How to do things instead- Content lives in files in the repo (`.ts`, `.json` or `.md`) and is imported at build time.- Interactivity goes in client components marked 'use client'.- Link between pages with `next/link`. Prefix any plain `<img>` src or hard-coded path with the base path so it works under `/<repo-name>/`.### Before you finish any taskRun `npm run build`. It must complete with no errors and produce`out/index.html`. If a feature only works with `npm run dev`, it is not done.If you changed a component or a story, also run`npx storybook build --output-dir out/storybook` and fix any errors.START YOUR SITE
cd appOnly run cd app if you are not already in the app folder.
npm run devThen open localhost:3000 in your browser.
5
In your second terminal tab, add Storybook. Run the steps below.
ADD STORYBOOK
cd appOnly run cd app if you are not already in the app folder.
npm create storybook@latestWhen it asks: “Are you new to Storybook?” → Yes “Would you like to install AI features?” → Yes “Do you want to install Playwright with Chromium now?” → Yes
SEND TO YOUR AGENT
Run `npx storybook skills setup` and follow its instructions precisely.OPEN STORYBOOK LATER
cd appOnly run cd app if you are not already in the app folder.
npm run storybook6
Ask your agent to build your components from your Figma design. AGENTS.md tells it how.
At least five components from your own design
7
Ask your agent to build your pages from the components in Storybook.Compare each page to your Figma file. When something looks wrong, check the component in Storybook first, then the page.
8
Ask your agent to set up deployment. AGENTS.md has what it needs.On github.com, open Settings → Pages and set Source to GitHub Actions.Commit and push. The Actions tab shows a green check and your live link when it's done.
Publishing with GitHub Actions
DELIVERABLES